

Auto alternator - Maintenance / testing
- Write a review
New product

Auto alternator - Maintenance / testing
In this opportunity I am going to talk about the maintenance that is done to the alternator, so that it keeps running for more time without problems.
What does this maintenance consist of?
Basically it is cleaning and measuring if you have a multimeter with resistance measurement function available.
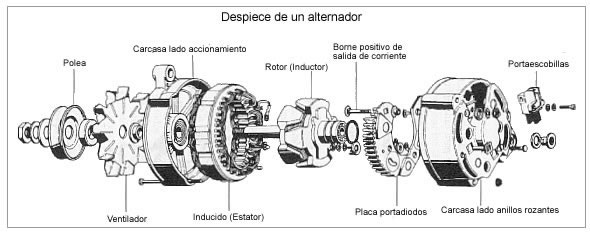
1 - First step is disarming.
In general, the disassembly of the alternator is quite simple, it only consists of three or 4 long stria type screws. They usually stick a little bit because of the heating and because of the type of material they are made of to dissipate the heat. To detach them, it is enough to give them a blow with the same screwdriver to the head of the groove as seen in the following figure:

The disarming of the alternator would be like that of the following figure:
2.- General cleaning of the housings.
In this case you should clean all the air ports so that they do not have dust or grease and thus the interior of the transformer can be cooled properly.
3.- Verify bearings
In this case it is necessary to inspect that the bearings do not make chirping sounds or that they have excessive play.
4.- Check the rotor
The rotor must be cleaned, you can use some dielectric solvent designed for electrical parts, do not use gasoline because it damages the insulation of the copper wire.Verify that the internal winding of the rotor has no signs of overheating or toasting (peels are seen on it).
Verify that the rings are well fixed and that they are smooth. If they are very dirty, you can remove the dirt with an 800 or 900 grit sandpaper.
Perform insulation measurement and the resistance of the field coil with an ohmmeter if it is available as follows:
Measure resistance between the two rings: Must be between 4 and 6 ohms.
Measure resistance between a ring and rotor mass: It must give infinite.

- Short to coil mass.
- Short between turns of the coil.
- Open field coil.
5.- Check Stator
Like the rotor, check that the winding does not show signs of overheating and that the insulation is in good condition.If there are superficial peelings, which do not involve the union between turns, it is possible to repair them easily by bathing a little the affected winding with dielectric barns.
Something important is that the core of the stator is laminated, each sheet is separated by a layer of insulating varnish, verify that there are no external shocks that have caused the joining of sheets, as this produces losses parasitic currents that cause hot spots. These hot spots are those that damage the insulation between coils and from coil to ground of the stator.
Carry out stator measurement in the following way:
- The resistance in the windings is quite low (less than 1 ohm), so we will only measure the insulation level between the winding and the stator mass.
To perform this measurement it is not necessary to disconnect it from the rectification body.
Place one point of the ohmmeter on the ground and the other on each of the connection points between the winding and the rectification body (diodes).

The measurement must give infinity. If it is not, there is an isolation problem and it is necessary to change it.
6.- Verify diode body
To check the diode body it is not necessary to disconnect it from the rest of the rectification system, but from the voltage regulator. The test consists of placing an analog lamp or multimeter between the terminals of positive and negative outputs as indicated in the following figure.

Once this test is done, it should also be checked in the opposite position. How is this? In the previous figure we can see that the power goes directly to the negative of the diode and the lamp is connected to the positive of the diode. In the opposite position, the lamp goes from the negative side of the diode and the power goes directly to the diode's positive.
If you use a multimeter that has the diode measurement function, you do not need the lamp. Connecting in one way will give you the voltage drop of the diode and in the other way it will give you infinite.
If this test fails, you must replace the complete diode.
7.- Test of container of coals
For the bunker, you only need to verify continuity between connections and that you have enough material so that it rubs well with the slip rings of the rotor. Generally for old alternators it is possible to change them without problems with tin solder. Of course, you have to use a good soldering iron with more than 60W of power, otherwise you will not be able to undo the solder or it will be bad.
Test of the regulator.
To test the regulator if it is a slightly more complex process, it usually depends on the brand of the same. So for the moment you can only do maintenance by cleaning the contacts and the heat sink so that it works cold.It's all for the moment, I hope you like the article.
Video of how I did it
Do you have questions or doubts?
Questions or suggestions can use the form below and I will gladly answer them.
Publicidad.
Follow me on Social Networks
 |  |
Written by
Ask a question
NO registration required!
If the question you have has not yet been answered here, use the form below to ask something about this addon.
 |
If the download link redirects to another product that is not described in the article or is broken, report it using our Reporting Form